Qt 공식 지원 라이브러리인 PySide로 계기판을 만들었습니다. PySide는 내장 라이브러리가 아니므로 pip install pyside6으로 설치해야 합니다.
PySide로 계기판을 만들기 위해서 QPainter를 사용할 것인데 여기서 주의할 점이 있습니다. 각도 계산은 math 라이브러리로 할 텐데 math에서 다루는 좌표계와 QPainter에서 다루는 좌표계는 반대로 동작합니다. 이해 대해 먼저 설명하겠습니다.
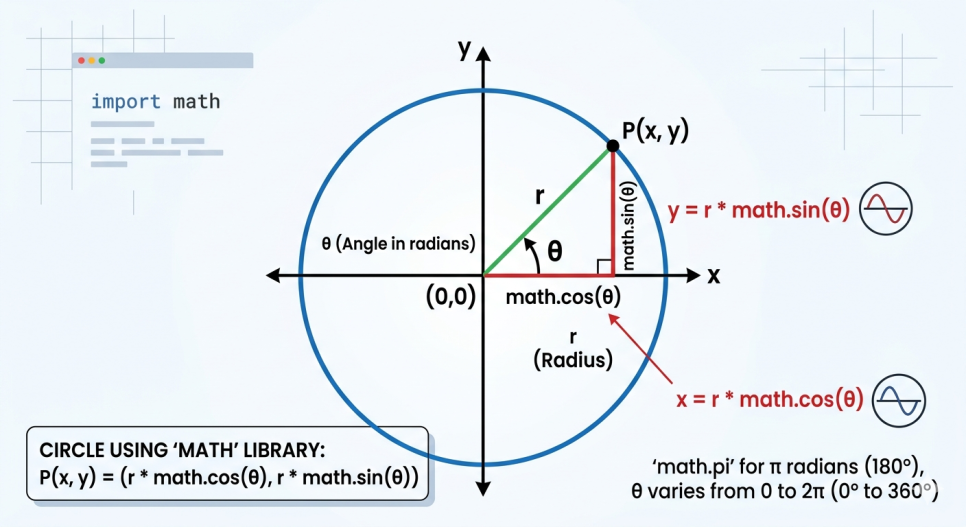
1. 수학 좌표계 (데카르트 좌표계)
파이썬의 기본 math 라이브러리를 포함해 일반적인 수학에서 사용하는 2차원 좌표계는 다음과 같은 규칙을 따릅니다.
- 원점 (0, 0) : 공간의 중앙이나 좌측 하단에 위치합니다.
- X축 : 오른쪽으로 갈수록 같이 커집니다.
- Y축 : 위로 갈수록 값이 커집니다.
- 각도(θ) : X축 양의 방향 (3시 방향)을 기준으로 반시계 방향(Counter-clockwise)으로 회전할 때 각도가 증가합니다.
[그림 1]은 math 라이브러리를 포함한 대부분의 수학에서 사용하는 좌표계입니다.
2. PySide 좌표계
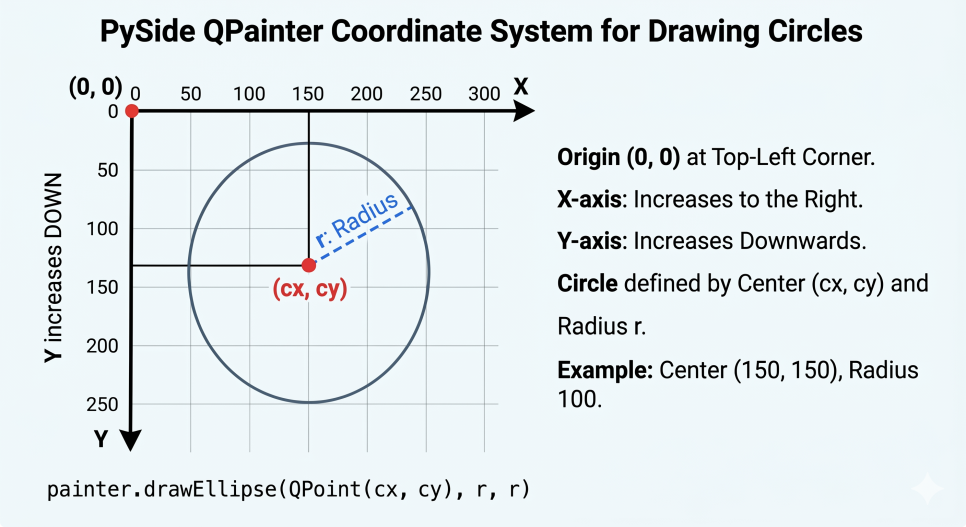
PySide를 비롯한 대부분의 그래픽/모니터 좌표계는 픽셀을 화면에 렌더링 하는 방식 때문에 다른 규칙을 가집니다.
- 원점 (0, 0) : 화면이나 위젯의 좌측 상단(Top-Left)에 위치합니다.
- X축 : 오른쪽으로 갈수록 값이 커집니다. (이 부분은 데카르트 좌표계와 동일)
- Y축 : 아래로 갈수록 값이 커집니다. (데카르트 좌표계와 반대)
- 각도(θ) : X축 양의 방향 (3시 방향)을 기준으로 시계 방향(Clockwise)으로 회전할 때 각도가 증가합니다.
[그림 2]는 PySide의 좌표계입니다.
3. 문제가 있는 코드
예를 들어 기준점 (cx, cy)에서 30도 각도 위쪽에 점을 찍고 싶어서 아래와 같이 코드를 작성했다고 가정하겠습니다.
# 수학적 사고방식 그대로 적용한 오류 예시
offset_x = r * math.cos(math.radians(30))
offset_y = r * math.sin(math.radians(30)) # 양수 값 도출

# PySide에서 그리기 (오류 발생)
painter.drawPoint(cx + offset_x, cy + offset_y)
수학 좌표계 (데카르트 좌표계)에서는 + offset_y를 하면 점이 위로 올라가야 하지만, PySide에서는 Y축이 아래로 갈수록 커지기 때문에 점이 밑으로 내려가서 찍히게 됩니다. 이 문제를 해결하기 위해서 Y 값에 (-)를 붙여주거나, 중심점에서 더하는 대신 빼주면 됩니다.
아래는 올바른 좌표 변환 코드입니다.
import math
from PySide6.QtCore import QPoint

def get_pyside_circle_point(center_x, center_y, radius, angle_degrees):
    # 1. 수학 공식을 이용해 X, Y 오프셋 계산
    offset_x = radius * math.cos(math.radians(angle_degrees))
    offset_y = radius * math.sin(math.radians(angle_degrees))

    # 2. PySide 좌표계에 맞게 적용 (Y축 반전)
    # X축은 그대로 더하고 (+), Y축은 반대이므로 빼줍니다 (-)
    gui_x = center_x + offset_x
    gui_y = center_y - offset_y

    return QPoint(int(gui_x), int(gui_y))

# 적용 예시: 중심 (150, 150), 반지름 100, 각도 45도
point = get_pyside_circle_point(150, 150, 100, 45)
# 이제 45도 '위쪽'에 정확히 점이 찍힙니다!
아래의 계기판 전체 코드입니다.
from PySide6.QtWidgets import QWidget, QApplication
from PySide6.QtGui import QPainter, QPen, QBrush, QColor, QFont
from PySide6.QtCore import Qt, QTimer
import math
import sys


class RpmGauge(QWidget):
    def __init__(self):
        super().__init__()
        self.rpm = 0  # 0 ~ 8000

        self.timer = QTimer()
        self.timer.timeout.connect(self.update_rpm)
        self.timer.start(30)

    def update_rpm(self):
        self.rpm += 50
        if self.rpm > 8000:
            self.rpm = 0
        self.update()

    def paintEvent(self, event):
        painter = QPainter(self)
        painter.setRenderHint(QPainter.Antialiasing)

        # 배경을 검은색으로 채우기
        painter.fillRect(self.rect(), QColor(0, 0, 0))

        rect = self.rect()
        size = min(rect.width(), rect.height()) - 40
        cx, cy = rect.center().x(), rect.center().y()

        # 게이지 범위
        start_angle = 135
        end_angle = 45
        span_angle = 270  # 270도 게이지

        # RPM 비율
        rpm_ratio = self.rpm / 8000
        needle_angle = start_angle + span_angle * rpm_ratio

        # -------------------------
        # 1) 배경 아크
        # -------------------------
        painter.setPen(QPen(QColor(80, 80, 80), 25))
        painter.drawArc(cx - size/2, cy - size/2, size, size,
                        -start_angle * 16, -span_angle * 16)

        # -------------------------
        # 2) 빨간 영역 (7000~8000)
        # -------------------------
        red_start = start_angle + span_angle * (7000 / 8000)
        red_span = span_angle * (1000 / 8000)

        painter.setPen(QPen(QColor(200, 0, 0), 25))
        painter.drawArc(cx - size/2, cy - size/2, size, size,
                        -red_start * 16, -red_span * 16)

        # -------------------------
        # 3) 눈금 (Tick Marks)
        # -------------------------
        painter.setPen(QPen(Qt.white, 3))
        for i in range(0, 9):
            angle = math.radians(start_angle + (span_angle / 8) * i)
            x1 = cx + math.cos(angle) * (size/2 - 10)
            y1 = cy + math.sin(angle) * (size/2 - 10)
            x2 = cx + math.cos(angle) * (size/2 - 30)
            y2 = cy + math.sin(angle) * (size/2 - 30)
            painter.drawLine(x1, y1, x2, y2)

        # -------------------------
        # 4) 숫자 표시
        # -------------------------
        painter.setPen(Qt.white)
        painter.setFont(QFont("Arial", 14))

        for i in range(0, 9):
            angle = math.radians(start_angle + (span_angle / 8) * i)
            x = cx + math.cos(angle) * (size/2 - 55)
            y = cy + math.sin(angle) * (size/2 - 55)
            painter.drawText(x - 10, y + 5, f"{i}")

        # -------------------------
        # 5) 바늘 (Needle)
        # -------------------------
        painter.setPen(QPen(Qt.red, 4))
        angle = math.radians(needle_angle)
        nx = cx + math.cos(angle) * (size/2 - 40)
        ny = cy + math.sin(angle) * (size/2 - 40)
        painter.drawLine(cx, cy, nx, ny)

        # -------------------------
        # 6) 중앙 원
        # -------------------------
        painter.setBrush(QBrush(Qt.white))
        painter.setPen(Qt.NoPen)
        painter.drawEllipse(cx - 8, cy - 8, 16, 16)

        # -------------------------
        # 7) RPM 숫자 표시
        # -------------------------
        painter.setPen(Qt.white)
        painter.setFont(QFont("Arial", 20, QFont.Bold))
        painter.drawText(cx - 40, cy + 60, f"{self.rpm} RPM")


if __name__ == "__main__":
    app = QApplication(sys.argv)
    w = RpmGauge()
    w.resize(400, 400)
    w.setWindowTitle("RPM Gauge")
    w.show()
    sys.exit(app.exec())
이 코드를 실행하면 아래의 영상 처럼 동작하게 됩니다.
'프로그래밍' 카테고리의 다른 글
| SQLite3 핵심 요약과 파이썬 예제 (0) | 2026.10.05 |
|---|---|
| pyside 윈도우 타이틀바 작업표시줄 아이콘 설정 (0) | 2026.10.05 |
| 파이썬으로 IP 기반 위치 정보 조회하기 (0) | 2026.10.05 |
| 파이썬으로 오실로스코프(DHO924S) 화면 캡처 (0) | 2026.10.05 |
| 파이썬으로 오실로스코프(DHO924S) 계측기 IP 주소 찾기 (0) | 2026.10.05 |


